
|
|
|

Edwin's Wheel replacement |
|
HOME Site Map Contact Us Except where stated this site is in no way affiliated with any of the products or companies mentioned or depicted within except as noted |
Some time ago a fellow named Edwin wrote to me several times and chronicled how he replaced the worn hard rubber tires on his Gilson snowblower. Since he realized this was a common problem he expressed a desire to share this material with other users. For some time I have been e mailing the text below and photos on an as needed basis when owners would write looking for ideas. This page just puts the whole thing online and available anytime to anyone. Thanks Edwin.
Hi Pete, I've been doing wheel research and thought I'd let you know what I
have found. Like many others, I will eventually need a pair of wheels to
keep my machine in use. I have a Montgomery Wards 5 HP 20" two stage about
1972 vintage and it currently has wheels that are about 6" semi-pneumatic and
about 10" outside diameter. They have an agricultural type tread and the
wheel has indentations where lugs on the tire engage to prevent slipping
between the two. My axle is 5/8", and the wheels have offset solid tube hubs
that mount to the axles with a single through bolt.
Even though those wheels have lasted about 30 years, I'd like to convert to
pneumatic, and in this case, it would probably be about a 4' wheel to keep
close to the 10" O.D. I currently have. As you know, every local supply
house sells both types of wheels, but to the last one, they all are a cheap
type of press in ball bearing, that's completely incompatible with a live
axle. I did not get a solution, but I have made my mind up for myself. Along
the way, I went to the Gleason Wheel Corp. website
and found an awful lot of free data on dimensions terminology and types. I
talked to a salesman for the company for a bit, and he was quite aware of
the Gilson brand, and even the eventual path to Lawn Boy and Toro. The fact
the company is located in Milwaukee makes me suspect they were the original
supplier to Gilson in the old days. He said I had two bad choices to choose
from, I could either machine hubs and weld them to standard wheels available
anywhere, or I could order about 250 wheels, and they would build me
anything I wanted. (He wasn't being an idiot, just telling me the truth). To
be honest, buying a couple hundred wheels in bulk would probably cost the
same as buying just a handful of wheels at dealer retail, But I don't need a
pile of wheels laying around any more than you do. A bulk buy may be a
future possibility, depending on interest you would receive from others, and
how many different sizes it would take to satisfy everyone.
What I have decided to do for me, is to machine and weld in hubs as he
suggested. I have the facilities, and had toyed with the idea before, If you
pop out the press in bearings, it leaves a fairly large (about 1" diameter)
hole though a pair of cupped plates that form the wheel. A piece of rod cut
to that diameter will slide in and weld on both sides. If the rod is drilled
to fit the axle, and cross drilled for the retaining bolt while it's in the
lathe, It should be a very simple operation. In neither case are high
tolerances required, and it's such low service speed that a slight bit of
runout won't be a problem. I hope this info is of interest to you. I know
it's one of your identified problem areas, and if nothing else, this
confirms what you already know. I have benefited from your site, and refer
to it from time to time. No need to respond to this, just trying to give
something back.
Next message........
The first picture (newoldwheels.jpg) is of the old wheel side by side with the new as bought wheel. They were made in China (like everything else is!) price for 4" wheel tire tube and two bearings is $4.50 each!!
The tractor cleats were completely worn off the old wheels by the chains action over the years, old wheels were 6" semi-pneumatic lugged fit. new wheels were 4" split halves bolted together. You will see in other pictures that both bearings were in a sleeve set into the back half of the wheel only. I tried to press bearings out of the new wheel and it accordioned, too cheap to manipulate that way. I just bought another wheel, and used oxy acetylene rig to burn the bearings out. Didn't put a mark in the bore. The before and after diameter in each case is about 10"
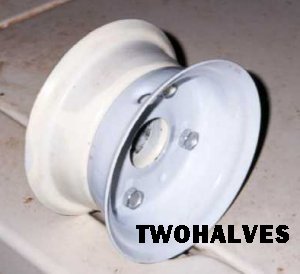
Here are 3 pictures of the new wheel. One with the bolts out and the bearings removed from the rear half and two views of the stripped assembled wheel. (boreview.jpg, strippedwheel.jpg, twohalves.jpg)
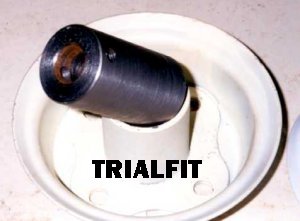
Here's a picture (trialfit.jpg) of the new sleeve posing with it's new home. It's a simple cylinder with a 5/8" drilled hole and a 1/4" cross drilled hole for the drive bolt. These are carbon steel for easy weldability and Would be quick for a machine shop to make. I had the good fortune to be able to make these at work out of junk. It was made to a length where it would stick out of the hub about 1/2" for plenty of room for the cross bolt to be fitted. The hub was not slid all the way down into the sleeve, It was bottomed and then withdrawn about 1/8" to create the weld joint. The weld was done inside the bore only and only at the end where the two wheel halves came together. A small amount of grinding was needed to clean up the joint, but not too much, as the outer wheel half had a small dish at that location anyway. The next picture (newwheelon.jpg) shows the assembled new wheel and Chinese tire on the machine. The tire was just slightly narrower than the original, so there was no problems with increasing the overall width of the machine. After the pictures were taken, I welded four spokes on the back side of each wheel from the center hub to the rim. This probably wouldn't be necessary, as the wheels were rated at 250 pounds apiece, but I now know that the load will be fully transferred to the rim without any flexing where the original sleeve was welded into the rear wheel half. I repainted the whole assembly and installed two 410-4 snow hog tires (Like you see on all the new machines. Made by Carlise, one made in USA, one made in China) which I got from tiresunlimited.com $10.13 each. They were made to be tubeless which these wheels will never be, so I used the tubes I had, just had to make a real small notch in the bead of each tire to pass the valve stem. It turned out near perfect, and very strong. There was about 1/2" of axle sticking out on each side when it was all done, so I slid a short rubber nipple over the end. It was originally made to cap the end of a cable, and they are commercially available and are only a few cents but finished out the look. I used up my film, so you'll have to imagine the spokes and the final installed appearance, but I'm very pleased with it all. Especially as the other option would be to throw away the machine. My final cost with all new parts, and purchased welding service was 41.26 for both wheels. If I had had to hire a machine shop for the hubs, add $20 to $30 as a guess. It wasn't free, but I feel a small price to keep the machine running. Hope this helps someone else, Ed.
Next Message......
As it turns out, I had three pictures in the other camera. I think the image is a bit sharper with this camera, but I had more problems with overexposure off the bright white surface. Here are the pictures:
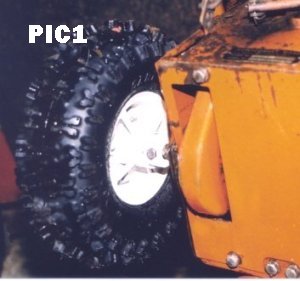
Picture 1 shows the spoke arrangement on the backside. This step was probably unnecessary, the wheels were rated at something like 250 pounds apiece, but I didn't like the way the weight was all on the extreme inside edge, so I added four spokes made from 1/4' bolts cut up and welded to bridge the center sleeve to the outer face of the rim. The big advantage of this, is I now feel the new wheels are as strong as the ones I removed.
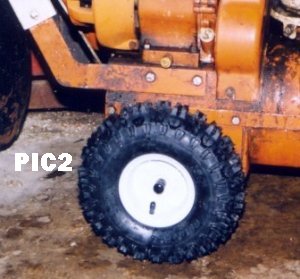
Picture 2 shows the same final arrangement as before, but with the snow hog tire in place of the tire that came with the new rim.
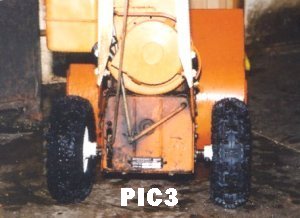
Picture 3 shows both wheels from the rear for a sense of the proportions. The original semi-pneumatic wheels were a bit wider than the newer tires are and even having them mounted slightly closer to the machine, there is a wider gap between the tires and the body than original.
You can use them all as you like as I have stated. If someone has a question that isn't apparent to you, or if you think of something, they or you can email me. I think the real trick is to just decide to do it. For me The trick was to admit I couldn't just buy what I needed. After that, doing it came to pass pretty easy. I think I spent about $60 or so for both, and that was with the new Snohog tires and farmed out welding services included. I did the hub adapter machining myself, so that would have to be factored in also. That may seem like a bit to spend, but when the other option is ditching the machine, it wasn't that hard of a choice to make.
Next Message:
Hi Pete, It's been a while since I modified the wheels and tires on my old 5HP. Now that we have had a few snowfalls, I just wanted you to know it works great, no problems. The very slight difference in height between the old semipneumatic tires with chains and the new snow hog tires have not changed it's ability to cut clean down to the pavement, and it is obviously way smoother running without the chains now. Traction is not as quite as good, but very adequate. I am very satisfied with the job and wanted you to have this final update.
Sent: Tuesday, January 21, 2003 12:06 PM
Subject: Wheels, my solution

![]()

![]()

![]()
![]()
![]()

![]()
![]()
![]()
![]()
Page created 3/3/04 - Updated September 20, 2021