|
|

FAQ Frequently Asked Questions |
|
HOME Site Map Contact Us Except where stated this site is in no way affiliated with any of the products or companies mentioned or depicted within except as noted |
- How do I identify my Gilson snowblower?
- Where can I get a manual for my Gilson snowblower?
- Where can I get an Illustrated Parts List for my Gilson snowblower?
- How do I determine when my Gilson was built?
- How do I determine when my engine was built?
- What is the horsepower of my engine?
- Friction Drive & Gear Drive
- Where can I get parts?
- What about belts?
- Paint Colors
- What should I use for oil?
- Why doesn't my machine throw snow very far?
- My wheel won't come off!
- My tires go flat!
- I need new tires!
- Can I add or replace an electric starter?
- How can I use my wheel pins?
- Where is my air cleaner?
How do I identify my Gilson snowblower?
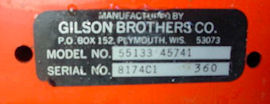
This is the tag you need to find. It will be located down low at the back of the machine on the end panel, down near your feet as you operate the machine.
Tag Explanation:
|
MODEL#
RAW SERIAL# |
|
MODEL#
CODED SERIAL #
|
RAW SERIAL: As far as I know these are simply unique sequential numbers that increased with each machine built.
CODED SERIAL: This string of numbers includes the year (1 digit), Julian date, Assembly line letter and Shift. Reference Service Bulletin 116.
SHIFT SEQUENCE:The number of that specific machine within that serial number's run.
Early machines had metal tags with stamped
numbers. These tags have tabs that are threaded through holes in the
machine and bent to stay in place. If all you have left are 2 empty
holes yours got lost along the way. Visit the family tree and begin to identify your machine or send some pictures and I will try to give you a model
number for ordering parts. Later machines have stickers in the same
location with the information. Many machines have decal designations
such as ST826, this is not the model number in most cases, be sure to
get the number from the tag. The exception seems to be FORD branded
machines where I have seen the actual ST-826 tag. On the 2 stroke Snow Cannons the ID sticker can be found on one of the lower handle tubes.
Note to Montgomery Ward machine owners: The machines built by
Gilson will have a GIL prefix on the model number. Machines built
latter may have a TMO prefix, these were built by MTD, they can be
found on my links page.
Where can I get Documentation for my Gilson Snowblower or RotoTiller?
In order to help recover the cost of digitizing and retrieving your information, there is a $10. fee. All documents will come by email in PDF format which can be viewed on any computer with a free viewer you probably already have. The digitizing process captures minute detail including blemishes, but the information is preserved and accessible. Here is a sample diagram, most are better a few are fainter. If you should ever have difficulty deciphering something I'm happy to help.
For models sold outside of the United States I can usually make a cross reference to a comparable U.S. model. Cross references may not include special export features such as battery powered electric starting, bucket extension visor or wrap around handle but it is otherwise the same machine.
I have had the final Gilson snowblower and roto-tiller microfiche illustrated parts list library digitized and offer copies in PDF format for your use. I have also accumulated a library of owner's manuals, factory service manuals, engine breakdowns and related documents. Documentation packages include everything that I have available for your model. At a minimum you will get the Gilson illustrated parts lists. Allow 24 hours for me to organize and send your files. I provide Briggs and Stratton illustrated parts lists however the service manuals are copyrighted publications that I cannot include. Please see this page for engine repair procedure resources.

|
EXPRESS DOCUMENT ORDERING Express ordering can be combined with any other parts you add to your cart.
1. Locate your machine's model number. This is the number circled in green in the illustation shown above. Do not use numbers that are on graphic decals like ST-826 or engine numbers. On most snowblower models the tag will be down at the bottom of the back panel. On Snow Cannons it will be on a handle tube. 1. If for some reason I cannot provide documentation for your model I'll promptly issue a refund (this is rare). In some cases I may follow-up with questions to clarify what you have for a machine. |
OR
|
QUOTED DOCUMENT ORDERING 1. Send me an e-mail message with your machine's model number. This is the number located on the Gilson ID tag. Do not use numbers that are on graphic decals like ST-826 or engine numbers. 2. I will confirm that your model number is in my library and let you know what I can provide. 3. Follow the link in my email to order the documentation. 4. When I receive your payment, I will gather the files and send them by return email. |
|
These are the genuine Briggs and Stratton manuals. They are concise and complete. Trouble shooting and repairs are covered in excellent detail and fully illustrated. Use the frst 2 digits of your engine's CODE number to determine the year of manufacture of your engine when selecting your manual. | |

B&S Antique Engine Manual Briggs and Stratton Antique Repair Manual Covers out-of-production B&S engines from 1919 to 1981. The L-Head was the B&S engine thoughout the Gilson era. This manual covers those engines built though 1981 that have conventional breaker point ignition. |
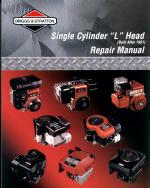
Late Model B&S L-Head engine manual Briggs and Stratton Small Engine Repair Manual For all L-Head (non-OHV) Single Cylinder engines manufactured after 1981. These will include engines with Magnetron Solid state ignition. |
|
Click here to locate engine manuals for other series of Briggs & Stratton engines. These manuals offer well organized step by step procedures and tips on getting the job done. I learned from one of these decades ago and they are now available in printed book form as well as electronic media. These are actual manufacturers publications and include all of the required torque values and test specifications.
Tecumseh engine owners Click here . | |
Friction Drive & Gear Drive
These terms refer to methods of controlling the traction system of
the machine. There are 2 general styles used in different
combinations by various manufacturers over the years. Both can
provide years of good service however with regular use some
maintenance is inevitable on a friction system.
FRICTION DRIVE systems by using a platter driven by the engine and a rubber tire that runs on the platter. The tire is connected to a drive train that will transmit power to the wheels. A combination of spring force and clever geometry allow this arrangement to transmit a high amount of torque. This mechanism will also allow the tire to touch down on the platter at varying distances from the centerline. The further away from the center the tire is the faster the machine will go. If it moves across the center it will be driven in the opposite direction (Reverse). Lift the wheel from the platter and you're in Neutral. For a friction drive system to change speeds two things have to happen, the wheel has to be lifted and then it has to slide to a new position where it is lowered. In Gilsons heyday many makes were using separate "Clutch" and "Shift" controls. Gilson called their friction drive system UniTrol (One Control). Theirs was particularly ingenious. Gilson engineers devised a clever linkage that generated the two actions in a way that is transparent to the operator. If you have one, watch under the handle as you shift and you will see it working two separate control rods.
Gilson single speed systems found on 4 and some 5hp models had one speed forward and one reverse. The wheel was friction wheel is hung between to platters driven together. When positioned between the platters it is in neutral. If it contacts the front or back platter it will generate forward or reverse power. This design also allowed for it to be a UniTrol.
GEAR DRIVE systems use a sealed gearbox to do the shifting operation. These are frequently made by Tecumseh's PEERLESS group. They are very durable boxes that will generally outlast the machine. They also save the manufacturer of the machine a lot of time in engineering and construction since many critical functions are solve with the single part. For those reasons the price difference between a friction drive and a gear drive machine (Usually about $50.) was insignificant and was driven more by extra heft in the gear drive machine.
The earliest Gilsons were of the gear drive configurations using a single speed box (Forward and Reverse). The premium machines had a HI and LO speed selector built by Gilson that selected the speed for both forward and reverse. The beauty of these machines is that the move at a good clip in both directions. This is in contrast with some machines (including some Gilsons) that were excruciatingly slow in reverse. These machine shine in yards that require you to blow repeatedly in the same direction.
My wheel won't come off
This is a very common problem on these machines. It is very
preventable with proper maintenance. If you find that you cannot
freewheel or remove the wheels after removing the click pins you
should take action right away before the problem gets worse.
The problem comes from the repeated reversal of the axle rotation. Every time the machine begins to move the click pin rocks slightly in it's hole. When the pin rocks it peens the steel axle and eventually metal begins to rise. Eventually this steel forces against the inside diameter of the wheel hub forming an interference. The axle has some relief around the holes but if not checked periodically it will lock up. Common rust can also be a culprit if the machine had excessive exposure to the elements.
If you do not need to get the wheel off the best thing you can do is move the click pins to the outboard holes. Allow the interference or rust to drive the wheels. Keep the axle coated with penetrating oil. If it does break free you should be able to wind the wheel off, then you can dress the axle and maintain it over time. With the wheel off the problem will be obvious. Dress the pin hole with a file, half round works best. Afterwards lay a stream of 30W oil on the axle and spin the wheel on coating the joint fully. Pin the wheel to the inboard axle hole. Check this every year or two.
If you need to force a wheel off work carefully. The rim by nature is hard to grip with a puller and is not strong enough to take a lot of force. If you can get one wheel off you may be able to remove enough parts to get the wheel onto a hydraulic press at a machine shop, parts store or equipment dealer. An acetylene torch can also be helpful to expand the wheel hub but be careful with the heat on other parts and near a fueled engine.
In some cases a little bit of constructive destruction is required. In the case of the UniTrol models this may mean cutting the axle. It can then be replaced or re-fabricated. Please contact me about part availability before doing so. The gear drive designs offer more press access and can usually be pressed apart safely.
My tires go flat
This procedures can be carried out with the wheels still on the machine although it is easier if you can get the wheel up on the bench.
Flat tubeless tires can be a persistent nuisance problem. Some tire wheel sets never flinch, others go flat when you turn your back. Tubless tires, low pressure and cold storage conditions can be a challenge. Usually it's an intermitent leak from the bead If it's a puncture just plug it.

![]()
I need new Tires!
Where can I get parts?
With part numbers we can now accurately seek what you need. Documentation will provide the original Gilson part numbers and some of those numbers are still widely cross referenced. The last word on checking availability is to search the LawnBoy numbers. Contact me with the numbers you need and I can cross reference and check availability.
For OEM parts the Gilson Snowblower Shop has partnered with M&D Mower. to provide OEM parts when they are available. When I search a part I will provide links to simplify ordering. M&D also supplies engine and Peerless transmission parts.
With the Gilson legacy well into it's 3rd decade many gaps have developed in what is offered for OEM parts. My objective has been to close those gaps wherever I can. On the parts page you will find reproduction and replacement parts for the most common needs. Many machines that were plagued with discontinued parts are now highly serviceable. These parts come from a mix of commercial and custom sources, many are exclusive to this site.
From time to time I acquire machines that due to incompleteness or
overall condition simply will never be running machines again. These
machines get parted down to support surviving machines in my
collection. Over time I have accumulated surplus quantities of some
items including many that have not been available for years. Let me
know if you are in need of a discontinued Gilson snowblower part. All
inquiries are handled on a case by case basis.
Consider keeping your eyes open for a parts machine. Remember that
since Gilson built many private brand machines the decals and color
may not match. You should be able to get a complete machine minus
the engine for well under $100. Depending on what you need for parts
this can be a great bargain. Just visit local dealers to see what
they have in their "graveyards".
Do not under estimate generic parts sources. If a bearing fails many are common items you can get
at a local bearing supply house look in your yellow pages under BEARINGS or POWER TRANSMISSION then bring your old parts in
for matching. The same holds true for gears, many are standard
profiles, you may need a local machine shop to add a key-way or size
a bore. Ask the clerk at the bearing shop, often they know of small
local shops that will do small jobs like this on a walk in basis.
Other items such as spacers, pins, grease fittings and such can be
found at a good local hardware store.
Finally in some cases you may need to enlist a local machine shop or
welder to fabricate or repair a part. Try to find a small machine
shop. Large shops have a lot of overhead and usually can't do this
sort of work at an affordable price. What you want is what is
referred to as a garage or basement shop, usually a one man operation
and in some cases part time. Bring in the damaged part and any other
parts that the new one will have to be fit up with.
Engine parts or service can be obtained from nearly any power
equipment dealer or online. Many
common needs
can be found here.
If you go in to buy parts be sure to bring all of
the numbers stamped on the engine.
What kind of oil should I use?
SNOWBLOWERS
What you use for crankcase oil in your 4 cycle (Gilson) snowblower has become a complicated question. Most engines are permanently marked with a suggested oil for winter use. That recommendation has changed over time and oil technology has also advanced. Many older engines suggested SAE 10W oil for winter use. Along the way it became SAE 5-20. There have been other variations, such as diluting oil with kerosene. Any of the suggested oils will do a fine job in moderate winter temperatures. The problems start in extreme cold. Petroleum oils begin to change states when you start getting below -10F. There are 2 important properties you can read up on if you like, they are "POUR POINT" and "PUMPING TEMPERATURE". The bottom line from my experience and research is that when you get into sub zero Fahrenheit conditions conventional petroleum oils no longer perform as expected. They begin to thicken and eventually certain components of the oil begin to solidify. When this happens in an engine that relies on splash or slinger lubrication the oil can get whipped into a froth and put the engine at risk. Exactly what temperature this will happen at depends on your exact brand and grade of oil. For me the simple solution has been to switch to 5-30 synthetic such as "Mobil-1". 5-30 Synthetic is now recommended as a year round lubricant on the B&S Website. The synthetic products have a much wider operating range, with pour points that run 20-30 degrees lower than comparable petroleum oils.
(Single Cylinder "L" Head Repair Manual 1999)
TILLERS and other warm weather equipment
For garden tillers and other warm weather equipment the gold standard is SAE 30 conventional detergent oil. 5-30 synthetic is also a recomendation today if you care to go that route.
HOW YOU CHOOSE TO APPLY THIS INFORMATION TO YOUR ENGINE BE IT
VINTAGE OR LATE MODEL IS ENTIRELY UP TO YOU. CONSULT YOUR ENGINE
DOCUMENTATION AND RESEARCH THE TOPIC AS NEEDED.
How do I determine when my Gilson was
built?
In late 1975, we changed to a nine digit serial number.
Example:
Serial number 8365B1 569
What is the horsepower of my engine?
How do I determine when my Briggs and
Stratton engine was built?
The MODEL number describes your basic engine, displacement,
carburetor style, horizontal or vertical shaft, and basic output
shaft features. The TYPE specifies any unique features, in
some cases they can be unique to your particular piece of equipment.
As discussed the CODE number identifies when and where the
engine was built. It is very important to bring the MODEL, TYPE,
and CODE numbers with you when visiting a dealer for parts.
If your engine predates 1965 this
site will help you date the engine.
How do I determine when my Tecumseh engine
was built?
Locate the ID numbers on your engine they may be stamped in the
shroud or in the form of a sticker. Find a number marked as
SER and/or D.O.M.. In the example 8105C
How can I use my wheel pins?
NEVER MOVE THE WHEEL TO THE END OF THE SHAFT AND PIN IT THROUGH THE
OUTBOARD HOLE! THE WHEEL MUST ALWAYS REMAIN UP CLOSE TO THE AXLE
BUSHING. THIS IS REQUIRED TO KEEP THE AXLE CORRECTLY POSITIONED IN
THE MECHANISM, FAILURE TO FOLLOW THIS WARNING WILL ALLOW THE AXLE TO
WANDER FROM SIDE TO SIDE AND CAN RESULT IN DAMAGE TO BOTH GEAR DRIVE
AND UniTrol MACHINES.
This has been such a peristent problem that Gilson began adding retaining rings to the axles so the wheels could not be moved out of true location. Read more and order rings for your machine here.
Why doesn't my machine throw snow very
far?
Snowblower versus Snowthrower
Replacements for the hard rubber and semi pneumatic tires used on
the early models are a tough nut to crack. These tires were also used
on a number of smaller machines in the latter years. So far I can
offer the following options:
![]()
The first step is knowing what you need. If you do not have your machine's original documentation getting an illustrated parts list is a good place to start. The first step on that path is to identify your Gilson snowblower. If the tag is missing or illegible contact me with some pictures and the numbers stamped in the engine shrouding, usually MODEL TYPE and CODE. From that information I can usually determine what you have.
CRIMSON RED
DUPLI-COLOR #DE-1607 CHEVROLET ORANGE-RED ENGINE ENAMEL
BEIGE
RUSTOLEUM ALMOND #7770
BLACK
RUSTOLEUM SATIN BLACK
Wizard Red
(Probably Plymouth and Senator too)
RUSTOLEUM REGAL RED
SILVER
RUSTOLEUM MATTE NICKEL #7277 (Drift breakers, control rods and linkages)
PRIMER
I generally use a gray spray primer. It overcoats well and is less obvious than red when the inevitable scrapes occur.

Factory original #13255
![]()

According to Gilson Service Bulletin #116 Dated December 4, 1978 It
gives the following explanation;
Each day of manufacturing has a repeat of the last three digits, but
the calendar day (digits 2 through 4) changes. This system allows us
to identify year, date, assembly line, shift, and time of day of
manufacture by serial number.
Here is a
table that picks those numbers apart.
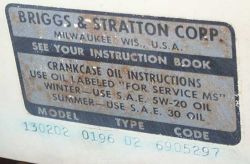
The CODE number on the engine determines the exact date
it was built. Here is a very simplistic way for you to determine the
build date. Follow these easy instructions:
We will use a date code of 6905297 for our example.
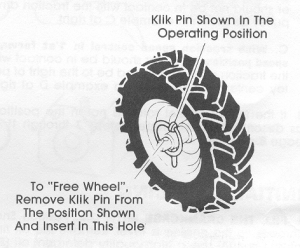 Many models used these pins with round bails for securing the wheels
to the axels. By moving the pins the machine could be made to
freewheel. By moving one pin the machine could be rendered one wheel
drive for easier handling in light duty.
A frequently asked question from the owners of Gilson and other
machines concerns throwing distance. There are many things that
enter in the throwing distance including the machine, operator
technique and natural conditions including the snow and wind.
Last but not least is the age old question of snowblower versus snowthrower. The 2 terms are often used interchangeably and there probably isn't a definitive answer to it, but here's mine;
![]()
What about belts?
I recommend that you get factory replacement belts for your machine. The OEM belts were engineered as part of the machine design. How a belt twists and bends as well as the work it does all enters into the design. Keep in mind that since they are special belts they are not always even inch sizes. A 1/2 inch difference can mean a blower that slips if the belt is long or doesn't stop if the belt is on the short side.
The cross section profile as well as the wrap of the belt are also important. While most of these belts are what would generally be termed 1/2 inch wide or L4 experience has shown that there is quite a range in the cross section of generic belts. This causes the belt to ride higher or lower in the pulley grooves and this changes the effective length. A belt of the proper length but having the wrong cross section will not work correctly.
Getting a generic belt to fit and function correctly can be a game of V-belt roulette. In the end the Factory belt will be your best buy. When you consider that most belts will last for a decade or more the slight price premium is a bargain. For your convenience I have gathered the belt ordering information of most common Gilson snow blower belts. You can find them on the parts page.
It's always good to own a spare set of belts. You never know when you will need one and you don't want to be counting on the local shop to have it on hand. Stored in a clean dark dry place they will keep indefinitely.
Can I add or replace an electric starter?
Getting an electric starter for your Gilson is not as straight forward as one would hope. Before you can add or replace a starter there are a few things you need to know. Most of this is in reference to Briggs & Stratton engines. The Tecumseh situation is similar.
Does your flywheel have a ring gear? In order to use an electric starter your flywheel must have a gear that runs along the circumference. For most of the "Gilson era" this was not necessarily standard equipment. For many years 5 HP units had to be factory ordered with or without the electric starter. Along the way the ring gear became standard on more and more engines and electric starters became a field (dealer) installed option. The gear will be found on the back side of the flywheel and you may have to remove a shroud panel to get a good look.
What is my ring gear made of? Early units had steel ring gears that meshed with brass starter motor pinion gears. Latter model units used an aluminum ring gear and nylon pinion. Engine documentation is ambiguous on this so you need to check. Also to my knowledge all currently available new starters are of the nylon pinion configuration meaning that an aluminum ring gear is needed. This often means a new and costly flywheel and it's installation is part of the project.
These starter motors can have a hard life. To make them weatherproof they are sealed. This means they have limited heat dissipation. They should never be used to coax a stubborn engine to life. They are meant to crank the engine and be turned off. Abuse can lead to things like melted brush holders. Since they are sealed and have carbon brushes the carbon residue is trapped in the motor. Despite being sealed, moisture can enter and promote corrosion.
Motors were supplied by several sources over the years making repair parts difficult to pinpoint, if they are even available. Some electric motor shops will do what they can.
Genuine and aftermarket motors were discontinued many years ago. New Old stock motors are exceptionally rare on Ebay. My best advice is to visit local small engine shops with your engine MODEL, TYPE and CODE numbers. If you can get a handle on the presence of a ring gear and the ring gear material that will be a big head start. With a little luck you will find a retired engine with a good starter and make a deal.
I do get some working starters that are still operable. I sell them "as-is", FINAL, no warranty, no returns, and price them accordingly. I provide a video of the starter cranking on my bench. If after everything I wrote you are still interested, contact me. These are handled on a case-by-case basis.
Where is my air cleaner?
Snowblowers do not have air filters. Normal operating conditions are
essentially dust free. Your air intake is ducted such that it is
shielded
from flying debris and the muffler serves to preheat intake air. Air
filters
would also be prone to icing.
Where do you keep all of your
machines?
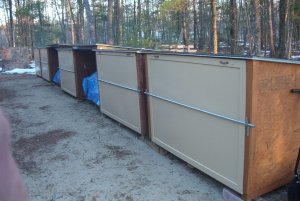
The major storage is in the form of Gilson Castle, 2, 40 foot storage containers and a 10" X 40" covered bay in between them. One container houses the working collection, the second container contains a few dozen Gilson projects in waiting. The center bay shelters large items and units on death row.

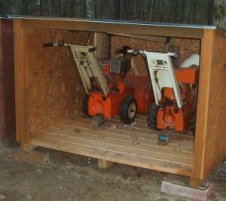
These 6"X6" storage sheds each house a pair of machines. Most are matched pairs that may become 2 for 1 projects.
Where do I Live?
I live in southern Maine (USA), about 10 miles inland, from the Atlantic Ocean. I get a mix of coastal and inland storms, or as the meteorologist have started calling them ,"winter weather events". The Coastal storms have a tendency to include sleet and freezing rain and sometimes end as plain rain, making for a heavy snow pack. Other storms are of the inland variety and include deep snow with blowing and drifting. Our average winter snowfall is 71 inches. Our snowiest winter (1970/71) brought 141.5 inches of the white stuff. In 1979/80 we receievd a scant 27.5 inches of snow. Our most challenging winter storms are those that end as rain, followed just a few hours latter by a long cold spell. If you don't clear it away in time you'll need a pick axe! Freezing rain can coat trees, utility lines and everything else with 1/2 inch or more of ice resulting in fallen limbs, wires and treacherous driving. Just plain snow generally is handled in stride. I clear a little over 10,000 square feet per storm of driveway and paths.
![]()

